


2017-09-16 ⋅ 9 min read
Setting up your first Node.js environment
Setting up a dev environment is almost always the hardest part of development; and this is especially true if you’re picking up a new tech stack you’re not familiar with.
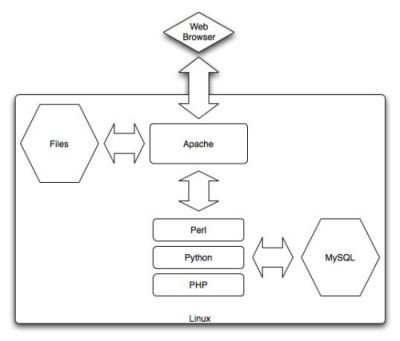
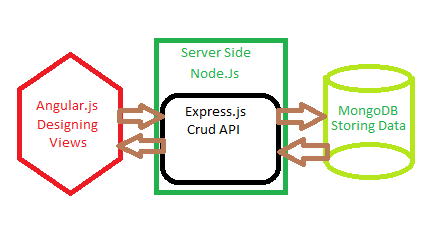
I came from a PHP world into Node.js earlier this year; and even the paradigm itself is different between the two, which makes this even harder. In PHP world, most of the time you use a separate web server software — usually Apache in the old days, possibly nginx nowadays. That web server software handles all of the request answering, and serving static files if that’s what it is, or passing it over to PHP if the request is for it. In a Node.js backend, the entire request lifecycle lives in Node.js code; there is no separate web server software. (It’s possible and common to use an nginx frontend to proxy requests anyway, for various reasons, but we won’t cover that use case.)
Within Node.js, you can have various server libraries that abstract away serving and handling requests for you, the most popular of which being Express.js. This means, even though both stacks have their own fancy acronyms (LAMP for PHP, MEAN for Node.js), they are actually conceptually a bit different.
Getting started
To me, one of the more intimidating parts of getting started in a new tech is understanding the full request lifecycle from client to server, and what every step touches, and how I set it up from scratch. When you join a new company using a new stack, you often don’t touch this part, and dive straight into coding.
Almost any experienced programmer will never have problems jumping straight into a C-style language even if it’s new to them, but understanding the whole stack gives you a clearer picture. However, there’s not a lot of articles or books that cover specifically this. The diagrams above is a good start, but now let’s look at how you would get started with your own project in the new stack.
Installing Node.js on your server / local machine
This is actually very simple! If you came from a PHP world, chances are you may be thinking about using a package manager like yum **(CentOS/RedHat) or **apt-get (Ubuntu) or **brew **(macOS) to get started.
There’s no need, and it’s actually not recommended. Instead, you will want to use nvm, a version manager for node.
Without doing any yum/apt-get/brew installs, simply run the wget or curl command described in their README (version 0.33.4 at the time of this writing):
curl -o- https://raw.githubusercontent.com/creationix/nvm/v0.33.4/install.sh | bashIt will install the node binaries as well as other files into the .nvm folder of your home directory.
It will also add the proper startup scripts to your .bashrc file, so whenever you start your terminal from now on, you will have the node commands ready. (Note that if you happen to be using Windows Subsystem Linux, the Ubuntu bash terminal that comes with it, having node installed makes the terminal start up extremely slowly. You may consider moving the auto-startup lines outside of .bashrc and/or making a command for it that you can explicitly call only when you need to do node work.)
So simply install node now by doing (the following installs node version 6’s latest revision for example):
nvm install 6Node’s package manager npm also comes with the installation. Now you can install any package available in node.js.
npm tips
Most of the time, your project has a package.json file in your project root, containing its dependencies. They will be downloaded when you run the npm install or npm i command in your project root, and files downloaded into a node_modules directory.
In some cases, you want to install a package globally. For example, if you’re working with Ethereum and Truffle Framework, you will probably want to install truffle globally. The command you would use is npm install -g truffle. This installs the package under the .npm/ directory in your user home dir, which has its PATH added to your shell, so you can just type commands like truffle after installing them.
Note that the npm global space is also by node version. If you switch node versions using nvm use 8 for example, you won’t have the same globally installed packages as when you were on node 6.
Using npm list -g can show you globally installed packages, but a good tip is to use it with the depth flag, like: npm list -g --depth=0. Most of the time this is what you want: See only the first level installed packages, without having to see their dependency tree taking up all the space.
Running a node.js server
The second part to understand in a request lifecycle is how the node.js web server runs on your server / machine.
This is where Express.js comes in. It’s a library that abstracts away all the code to set up a web server in Node.js code for you, which makes it very easy to get something up and running. The Hello World example on Express.js gives you a good idea of how it works. After the npm install command for Express.js and setting up a default endpoint like the sample code shows, all you do is run the the program like this:
node app.jsAnd your web server will be up and running. This is good enough for testing, as the server will be running for as long as you keep the terminal up and not terminate the command.
Production node.js server
In production for a public/live site, instead of just running the node command like above, you’ll most likely use a process manager like pm2.
Once you’ve npm installed pm2, all you really have to do to start your server is:
pm2 start app.jsThen your production server is up and running!
pm2 will help keep your service running. If your node code fails and terminates for any reason, pm2 will restart it.
Lead Engineer @knockdotcom. Previously, Principal Engineer @Massdrop, CTO @CoinTent, Architect @Zynga.