


2017-08-14 ⋅ 18 min read
Installing Linux (CentOS 7) on an older Windows laptop
Even being a developer, installing Linux has never been a simple and straightforward process to me. Things are a lot easier now in 2017 (even if it’s just because of having StackExchange now!) than when I last tried it 15 years ago, but there are still some gotchas along the way, and I wanted to document this process.
If you’re just skimming below, know that most of the gems/gotchas are going to be in the second half of the article, while most of the first half is introduction.
Prep Work Before Starting
Background: I have an older laptop (a Dell Latitude E6410) currently running Windows 10. The laptop came with Windows 7 several years ago. This is an important bit to note, because laptops that came with Windows 8 that you upgraded to Windows 10 have a different booting system.
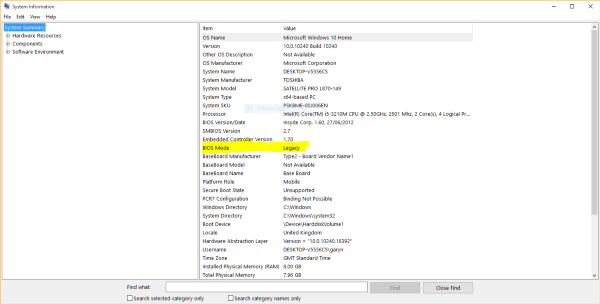
To verify exactly your laptop’s booting system, you want to look in your Windows’ System Information (open start menu, type “System Information”): look for the BIOS Mode parameter, see if it says Legacy or UEFI. In my case, it says Legacy, which makes sense since my laptop used to run Windows 7 and I upgraded to 10 a while ago. If your laptop came with Windows 8 when you bought it, it likely has UEFI BIOS mode. The screenshot above comes from this guide for installing Ubuntu for dual booting with Windows 10, which is also a useful guide, but I’ll be writing about installing CentOS 7.1 below.
Picking Your Linux Flavor
Ubuntu is currently the most popular Linux flavor for home desktop/laptop uses. However, I personally opted for CentOS, simply because I’m more familiar with it, having used it as a server OS for years in development.
There are many Linux branches/flavors. The names you’ve most likely heard of, a lot of times, are probably RedHat, Fedora, CentOS, Ubuntu, and Debian. For a really comprehensive look, this infographic of Linux branches is excellent.

My short summary would be that RedHat (RHEL), Fedora and CentOS came from the same family branch, while Debian and Ubuntu came from a different one. On the RedHat side, RHEL and CentOS are the “server” branches (with RHEL being enterprise and CentOS being community-driven) while Fedora is the “workstation” branch (i.e. more suitable for home uses). On the Debian side, Debian is the “server” branch and Ubuntu is the “workstation” branch (though Ubuntu is also really popular as servers now). Within the same family branch, things are really similar. The key differences between the two main family branches when you use them in your daily life will probably just be differences in names of common commands (yum vs apt-get, for example) and location of config files.
Downloading CentOS
On the download page of CentOS you’ll find three different types of ISOs to download: DVD, Everything, and Minimal. An ISO is a file you can burn into a CD or DVD (or USB drive in modern days) directly, and it gets formatted correctly as an installation disc. (Alternatively, it is possible to just buy a CentOS installation DVD, if you have slow internet or don’t want to burn a DVD or USB drive.)
This forum thread explains the differences between the different ISOs. In short, if you have a working home internet, you should pick Minimal. The smaller size allows you to burn it onto even just a CD (not even a DVD!), so you can save on an extra USB drive or a DVD-RW. This is what I chose, since I have plenty of CD-Rs laying around that I don’t have uses of; and also allows me to make the smallest download and get going immediately.
Understand that with Minimal install, you are downloading a version of CentOS that’s command-line only by default. (i.e. don’t freak out when installation completes and you boot into a DOS-like screen!) However, you will quickly be able to use yum installs to get a Windows-like graphical user interface, so it will not be an issue.
Once download completes, you will want to be sure to validate your download sha256 sum, to make sure the file is genuine and is also not corrupted by the transfer. The steps are simple: Download the sha256sum.exe file linked on that page, and run it on the .iso file. Go back to the list of download mirrors, and for whichever mirror you used, go to the folder containing the file (e.g. http://distro.ibiblio.org/centos/7/isos/x86_64/ if you used that mirror), and click on the sha256sum.txt.asc file to make sure the hash matches the file you downloaded.
Once downloaded and verified, burning an ISO file to a CD from Windows 10 is as simple as right clicking the file, clicking “Burn to disc” from the menu, inserting a blank CD-R to your drive and starting it.
The next steps will be preparing your computer for the installation. We will generally follow the outlines laid out in this Tecmint guide on installing CentOS 7 dual boot with Windows on UEFI systems, except my laptop is non-UEFI, so I have some notes below.
Shrinking Your Hard Disk in Windows 10
This is a good guide on using Disk Management utility to shrink your current Windows disk volume to leave space for the Linux installation. I shrunk for about 50GB. The minimum recommended amount seems to be around 20GB for the new OS to perform well.
Booting into Your Linux Installation Disc
Most guides mention that on a lot of computers nowadays, if you inserted a CD/DVD or a USB drive before rebooting or starting up, it should boot with it. That’s not the case for me, which is something I also expected.
In my case, I pressed F12 for boot options on start up. Other potential trigger keys might be F7 or F8, depending on your machine.
I was presented with the choice of Legacy boot mode with hard disk (normal, Windows) or CD drive, as well as a UEFI boot mode with CD drive (interestingly enough, available as an option, even though I have a legacy BIOS system).
I had actually attempted to use UEFI mode, which actually successfully started the CentOS installer for me, but ran into a failure during the disk partition step later.
When I booted with Legacy mode with the CD, everything worked properly. (as it should, since I have a legacy BIOS system.)
Installation Begins
At this point the CentOS installation begins. You can follow the Tecmint guide above for the most part.
Be sure to set up network information (usually wifi name and password, since most people have wifi at home now) during installation, so you don’t have to figure out how to set up network info in command line later, and can just get right into yum installs to download and install packages later.
On step 9 of the guide, the installation destination and partitioning step, I recommend following the guide to choose “I will configure partitioning”. However, once you proceed, you may see something different from the guide, namely the following screen:
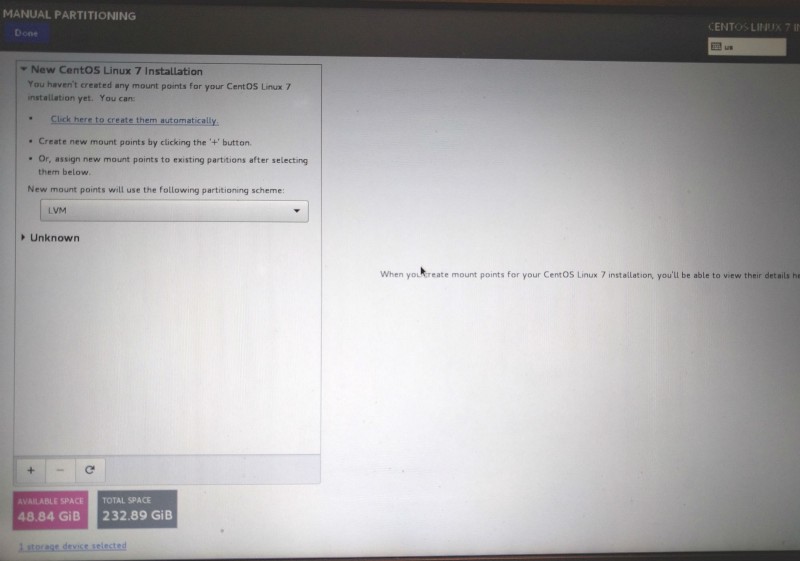
Feel free to click “Click here to create them automatically”, which will set up the basic partitions you need for you using the free space you previously shrunk in your disk volume from Windows Disk Management. You should see something like this then:
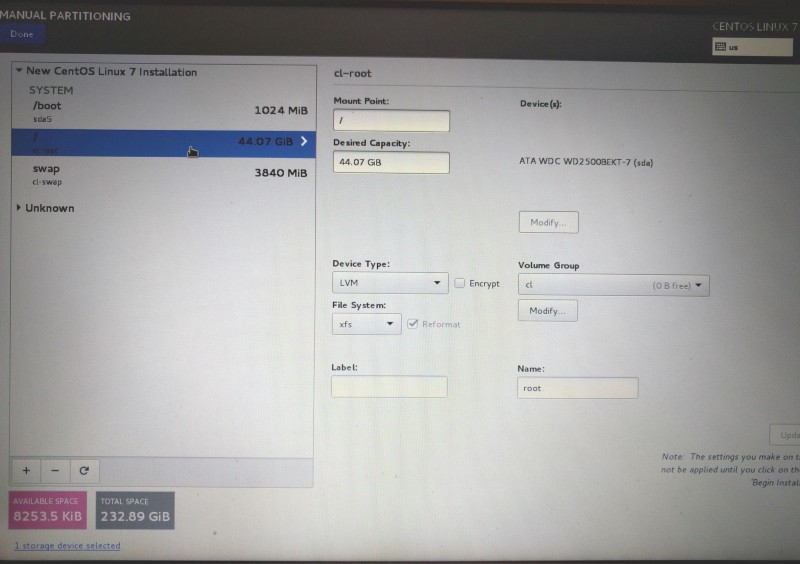
Despite what the Tecmint guide says about creating a system partition, and then a user data partition mounted on /home, you can simply have all the remaining empty space on the system one on root level / instead. You still do get a /home directory with your user data.
[Edit]: I’ve since read more about why you want a separate partitions for the home directory. It’s not required, but a nice-to-have. This article explains why. Basically, it allows you to completely wipe and reinstall a Linux OS, while keeping your home directory (where all documents and personal files are) in tact.
Once installation starts, you will also be asked to create a root account (and password) along with a user account. Create those and don’t forget your password.
Booting into Windows After Installation
Unlike the guide which says I should see a boot-up menu listing both CentOS and Windows on start up, I lost the ability to boot into Windows after installation. I followed this answer about grub2 to add it back.
First, I started with this command:
sudo grub2-mkconfig > /dev/nullWhich actually did not list “Windows 10” as an option. This means I had to install a package first before I could see it. As mentioned before, I entered my network information during installation, so I have a working wifi and can just download the packages this way:
sudo yum install epel-release
sudo yum --enablerepo epel install ntfs-3g
Once installation of ntfs-3g completed, meaning CentOS can now read NTFS file systems (which Windows uses), I did the sudo grub2-mkconfig > /dev/null command above and can now see Windows listed. Finally, I run the following to add Windows to the list of boot-up options. (Be sure you actually saw Windows in the results of the previous command before you do this, otherwise it won’t do anything.)
sudo cp /boot/grub2/grub.cfg /boot/grub2/grub.cfg.old
sudo grub2-mkconfig -o /boot/grub2/grub.cfg
Gnome vs KDE for Graphical User Interface
Unlike Windows, which essentially has one type of UI (that you can still customize fairly well), Linux is open-source and tends to have multiple options for a GUI / Windowed UI. Among them, in CentOS, Gnome and KDE are the most popular.
Based on this video, I chose KDE for the better performance. To install KDE, I followed this answer. It really only involved a few commands. The first is the download and installation:
sudo yum -y groups install "KDE Plasma Workspaces"This will start a ~800mb download and should take a while. After that, run the following:
echo "exec startkde" >> ~/.xinitrc
startx
Which will start up your KDE GUI environment.
Booting into CentOS 7 with a GUI
In my case, after doing the KDE installation above, my machine still booted into CentOS command-line only instead of automatically starting the KDE environment.
I had to configure CentOS 7 to boot into a GUI (KDE in my case). Some answers online mentioned opening the file /etc/inittab to change a config value. As of right now in CentOS 7, you will actually see that the file mentions in its comments that it is no longer used, and asks you to use the following command:
sudo systemctl set-default graphical.targetThis works properly. Once I reboot now, and choose CentOS from the boot up menu, I can now get directly into the KDE environment.
That’s about it!
At the end of all this, you should now have a laptop (or desktop) dual booting Windows 10 and CentOS Linux 7!
Lead Engineer @knockdotcom. Previously, Principal Engineer @Massdrop, CTO @CoinTent, Architect @Zynga.