


2017-12-26 ⋅ 27 min read
A Modern Home Karaoke System built with YouTube API, WebSocket, Redis, QR codes, and a Chrome extension/WebAudio
Nov 2020 Update: Youtube has shut down the API access for Karaoke.house and Singk.net over the summer, after reviewing it to be not compliant with their terms of service. As such, the web sites will go offline permanently starting at the end of this year. It had been a good run with a small number of avid users while it lasted!
I’m as much of a singer as I am a software engineer. Like most singers, I engage in singing in a variety of ways, like playing in a band, and going to karaoke.
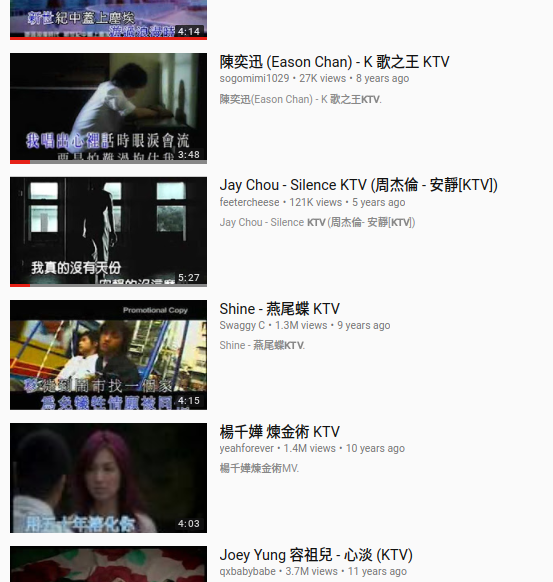
As far back as 2012, I’ve noticed that a lot of YouTube users have uploaded Chinese karaoke music videos (also known as KTV videos) onto YouTube, with or without licenses. This got me thinking and trying things out — I could very well do karaoke at home with the content available on YouTube, but the YouTube interface wasn’t designed for karaoke in mind, so there’s a lot of inconveniences. Selecting songs effectively, moving the songs in the queue around, skipping tracks, or even adjusting the audio for instrument only or with original voice all proved difficult. (Most Chinese KTV videos utilize the left and right audio channels, one for original vocals and one for instrumental-only. You would have to adjust your Windows or Mac’s volume control setting to output only the left or right channel to get the desired audio.)
This was when I first had the idea to create a home karaoke system using modern web technologies — using the YouTube API to create a custom video player, and a layer built around it with functionality to work like the software you’d find at karaoke studios. Around late 2013, I finally began working on a prototype. This is the beginning of what would become SingK.net (唱 K 網; Chinese version) and Karaoke.house (English version).
This hobby project is probably one of the more technically diverse ones I have worked on; having gone through two versions of it and some experimental prototypes. In this post I’d like to walk through the tech and discuss some architecture design and sample code.
The Product Idea
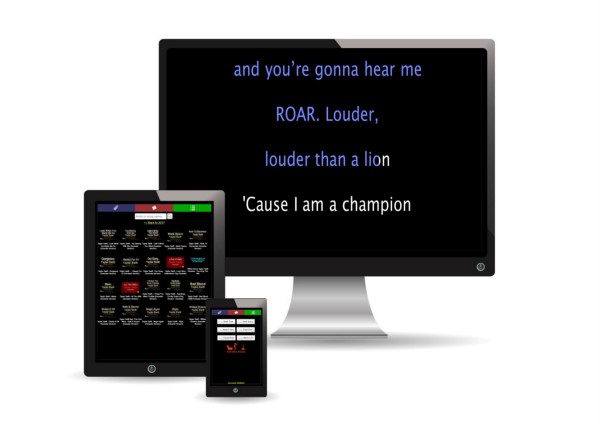
The basic idea is for it to work like the software you’d find at an Asian karaoke room. The TV screen plays music videos (with lyrics as subtitles at the bottom), and a separate computer (with a remote control) used to search for songs, skip tracks, pause, restart, and so on.
The idea is to replicate this experience at home: Using the computer screen (ideally hooked up to the TV in the living room, as in a media PC setup) for the video, and your smart phone (or tablet) to act as the “remote control” combined with an interface to search for songs.
The concrete feature requirements are: 1) The mobile control needs to affect the video player on the computer (i.e. a separate device) in real time, and this includes both queuing up songs from the remote to play them on the computer, as well as video playback control functions like pausing/playing; 2) Ability to adjust the left/right audio channels on the videos.
V1: YouTube Flash API, Redis (2013–14)
Back in 2013, Flash was not completely dead yet. I also happened to have some background in Actionscript coding, thanks to working on Facebook games for my job at the time. I believed that it was the right tech choice to build this in, for a number of reasons:
- Better sound transform feature set. I need the ability to output only left or right audio channels. WebAudio in Javascript wasn’t widely supported by browsers back then. Flash offered this without compromise. Additionally, using WebAudio with YouTube’s Javascript player API will prove to be an issue, which we will cover later in V2.
- WebSocket was still a relatively new tech in 2013 and less widely supported. To achieve real time communication between two devices, including having a web browser client receive data synchronously, I need it to keep an open socket connection with the server. Without WebSocket, it pretty much comes down to using socket connections in Flash.
- YouTube still offered a Flash API for the video player at the time, making this whole project possible at all.
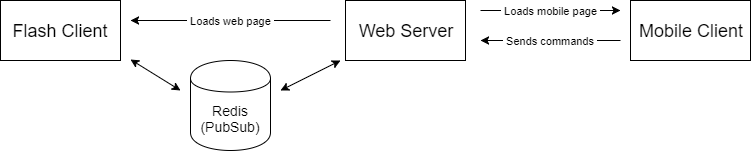
To accomplish #2 above, I would open a socket connection to a Redis server directly from the Flash client (open up the Redis port on the server’s firewall), and utilize Redis’ pubsub functionality, which lets the client subscribe and listen for commands published by the server.
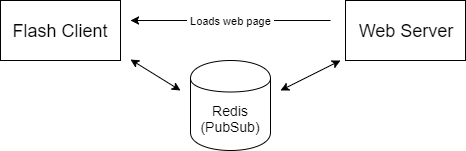
Now, it sounds crazy from a security standpoint to open up a Redis server to the public, but Redis actually has features to help with this. Using the rename-command config (as shown here), you can disable every single command on that public-facing Redis instance except for PUBLISH, SUBSCRIBE, and QUIT. It also helps to run this Redis instance not off the default port of 6379, which will significant reduce scanners/bots finding your open Redis instance at all.
Once this is all set up, the user’s Flash client, running on a web page on the computer, can listen to commands real time from the server. (The connection is kept open the whole time while the user is on the page)
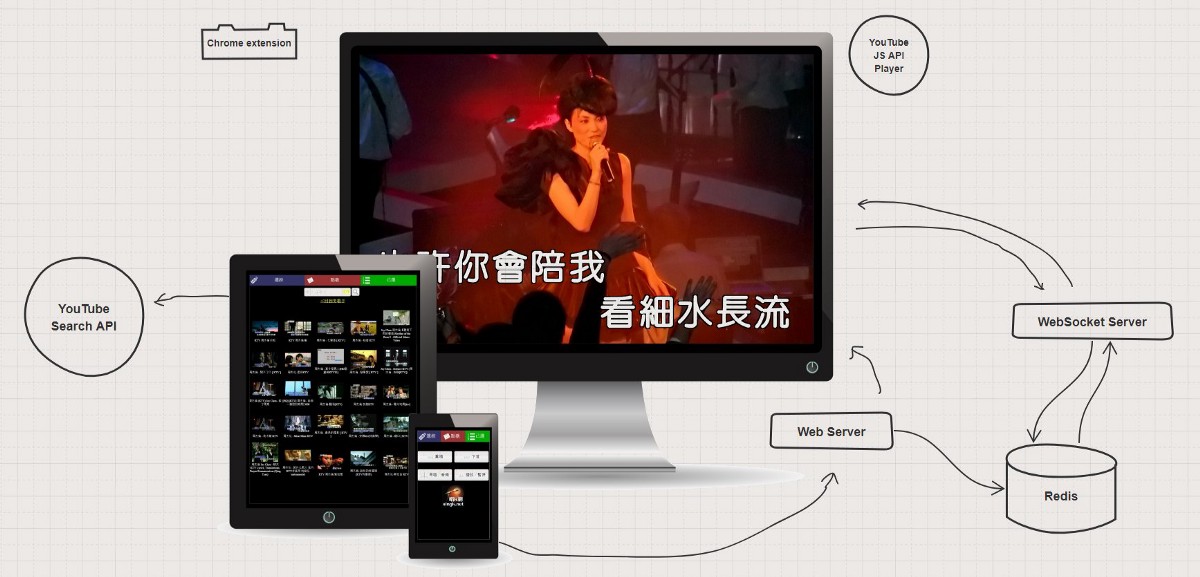
After that, all that is needed is for the mobile client (mobile web; i.e. normal web pages) to make requests to the web server for issuing commands. To issue commands like playing/pausing, changing audio channels, queuing up songs, it just has to make AJAX requests to the server in Javascript like any other web page. This is what the full architecture diagram looks like:
Problem: The end of Flash
Apple famously decided not to support Flash on the iPhone. Now, this wouldn’t actually affect us as we run our video player on the desktop. However, the trend of Flash dying was very real. YouTube has also decided to end support for its Flash API, not long after I’ve completed V1 of this project using the architecture above. All developers using YouTube’s Flash API are supposed to migrate to its newer Javascript API player.
This creates some problems for me, as I chose Flash not just because of the YouTube player, but for several other reasons as well, as mentioned above. YouTube deprecated the Flash API around 2015, and has completely dropped it from working some time in 2016. The app has become broken by this time.
I would now need to migrate the video player part of this app to the YouTube JS API. To do this, I would need to rewrite two main features:
- The socket connection that stays open with Redis.
- The sound transform in Flash (left/right audio channel isolation/selection) has to be redone with different technology.
Fortunately, it was now 2017 when I worked on this, and WebSocket is much more widely adopted by all modern browsers.
V2: YouTube JS API, WebSocket, Redis, QR codes, and WebAudio/Chrome extension (2017)
Because of the changes needed, V2 is not just a video player client rewrite from Actionscript to Javascript, but also a redesign of its architecture.
To move from a Flash <-> Redis <-> Web Server architecture to a WebSocket architecture, there are 2 options for architectural design to achieve real time communication:
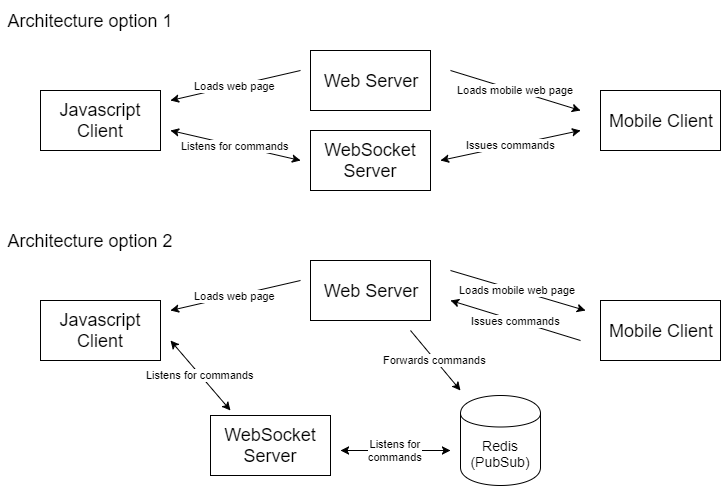
At a glance, option 1 looks architecturally simpler; but it actually poses more challenges in implementation:
- The WebSocket server requires a lot more logic: It needs to be able to tell which is a mobile client, and which is a desktop client; so that it listens for commands from mobile and issues them to the desktop client.
- It also requires the mobile client to open a WebSocket connection. In this app, the mobile client is a mobile web app. A user’s phone, during a singing session, could go in and out of standby/screen-off mode, even in and out of the web browser itself. This makes maintaining a WebSocket connection flakey and laggy at best; and at worst it creates a poor UX when pressing buttons fails to do anything.
Option 2, while looking more complex in an architecture diagram, actually has more similarities with our original design, making the rewrite of the implementation from V1 a little easier and smaller in scope.
- Mobile client works the exact same way: It doesn’t need to know about the WebSocket server, and just sends commands to the web server via regular AJAX requests. The web server also works the exact same way in that it sends the command to Redis via publish (the pub part of pubsub).
- The main change on the new Javascript desktop web client, from the Flash client, is that instead of connecting to Redis directly, it now connects to a WebSocket server.
- This allows our WebSocket server to be simplistic: There is only 1 type of client that would connect to it; and there is only 1 kind of thing it can do with a client (sends commands to it). It does need to open a connection with the Redis server, but that is relatively trivial.
- Even though we still use Redis, we can now close off our Redis server from the public (turn off that port in the firewall). This is because only the WebSocket server needs to talk to it now, instead of all the Flash clients like before.
For the reasons above, I chose to go with architecture option 2.
Nodejs: the Perfect tech for the WebSocket server
The web server backend for the project has always been PHP. I’ve used it for 10+ years before this project, and in 2013 when I started this, PHP was still relatively popular, while nodejs was less widespread as a web server backend.
So when it came time to write a WebSocket server, naturally I tried to stick with PHP, keeping the tech stack the same/small for the same project and not have to install new software on my server box.
I soon discovered that WebSocket libraries in PHP are fairly constrained in what you can do, due to the non-asynchronous nature of PHP — a WebSocket server’s asynchronous aspects are often handled in an event loop, making it hard to also have a completely separate async aspect in the same server program code (i.e. one for connecting to Redis and using SUBSCRIBE to listen for commands, firing callbacks when they come). This was when I decided PHP was not the right tool for this.
This was already 2017, and nodejs was already very mature as a platform to develop on. There are not only tons of npm packages available for everything, the asynchronous nature of nodejs also makes it a perfect tool for this use case.
Using the ws and redis npm packages, the nodejs code for the WebSocket server pretty much comes down to this:
const WebSocket = require('ws'),
  Redis = require('redis');

const redis = Redis.createClient({host: 'localhost', port: 6379});

/**
 * Listens for Redis messages
 */
redis.on("message", function(channel, message) {
  // parse message from web server that came through redis pubsub
  // then issue a send() command to a websocket connection
});

const websocketServer = new WebSocket.Server({ port: 8080 });

websocketServer.on('connection', function connection(client) {
  // store the connected client for making send() to later
});
Of course, there are a few more things like logging, error handling, and cleaning up connections. Additionally, with the ws package, you will want to manually handle keeping a heartbeat to maintain the connection. But ultimately, the entire WebSocket server came down to about 100 lines of nodejs code in one file.
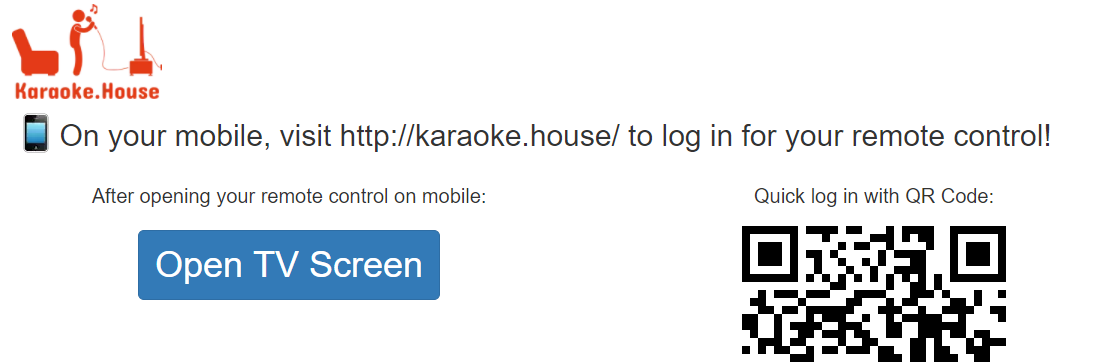
Logging In: QR Codes
As you would have guessed by now, the premise of having this whole architecture work is to have the Javascript desktop web client and mobile client log in to the same account.
Making this work is trivial: Since you log in with a username and password, you simply type in the same username/password into both the desktop side as well as the mobile side. After that, every command issued from mobile will go to the right desktop client (of the same account). This is how it has worked since V1.
As we all know, however, typing in passwords on a mobile device is not a pleasant UX.
After a bit of thought, it occurred to me that this might be a perfect use case for QR codes. To use Karaoke House, you always have to log in on both desktop and mobile. You almost always log in on desktop first, then log in on mobile to the same account. Why not generate a QR code image when you’ve logged in on desktop, and just let the mobile device scan it to log in, without having to type anything at all? (For those familiar with Whatsapp, Whatsapp Web works in a similar but inverse way — you are logged in mobile-first, then you use the phone and scan a QR code on web.whatsapp.com to make the desktop web client log in to the same account as your phone’s.)
Generating a QR code is relatively easy in most languages, as there are open source libraries out there already written for this. In my case, with a PHP web server backend, I made use of PHP QR Code to do this.
A QR code is really just a text string that’s encoded into a square with tiles of smaller squares within it. The way to implement a QR code login system is to simply generate a long enough random string of characters, then store it into your database (or Redis), associating it with the account of the user who has already logged in on the desktop. Then you simply output the QR code as an image with your library of choice.
// A not very up to current cryptographically-secure standard way
// of generating a random string: just one example way to do it
// in PHP. Generates a 60-character hex string randomly.
$qrString = bin2hex(openssl_random_pseudo_bytes(30));

// Store the string into database, associate it with the user ID
// of the currently logged in account.

// Using the PHP QR Code library, this generates/outputs a QR code
QRcode::png($qrString);
On the mobile client, I use the Instascan JS library, and the code to create a working QR scanner is quite simple:
var scanner = new Instascan.Scanner({ video: document.getElementById('preview'), mirror: false });

scanner.addListener('scan', function (content) {
  // When scanner detected a QR code successfully.
  // The "content" variable will contain that random string
  // you generated from the server side above.
  // Submit login form here with that data to log in as that user.
});

Instascan.Camera.getCameras().then(function (cameras) {
  if (cameras.length > 0) {
    scanner.start(cameras[cameras.length-1]);
  }
});
Aside from some additional error handling, there’s not much more code needed to have a working QR code login. Of course, on the server side, the login endpoint will need to read the QR string, and look it up from the database to match the user account to log into.
The final problem: Left/right audio channels in Javascript WebAudio
At this point, we’ve just about recreated every functionality we have had from the V1 Flash version, and even improved a lot of things (such as QR login, no Flash plugin requirement, no longer having a public-facing Redis server).
The last piece of the puzzle for V2 is sound. Admittedly, this is much less of an issue for the English version of Karaoke House, because English karaoke videos don’t tend to use the left and right audio channels separately. However, it’s almost a requirement for Chinese KTV videos.
Our answer lies in the WebAudio API in Javascript, which allows you to do a huge variety of things with sounds on a web page. However, things will get tricky.
The WebAudio JS code to modify sounds on a web page to only use the mono-left channel or the mono-right channel looks something like this:
audioCtx = new (window.AudioContext)();

source = audioCtx.createMediaElementSource(node);
// "node" is the DOM node that contains the element with sound,
// can be a <video> or <audio> element.

splitter = audioCtx.createChannelSplitter(2);
source.connect(splitter, 0, 0);
gainLeft = audioCtx.createGain();
gainRight = audioCtx.createGain();
splitter.connect(gainLeft, 0);
splitter.connect(gainRight, 1);
gainLeft.connect(audioCtx.destination, 0);
gainRight.connect(audioCtx.destination, 0);

// from here on, if you want to switch to left-only, do:
gainLeft.gain.value = 1;
gainRight.gain.value = 0;

// and vice versa for right-only.
This would be relatively easy if it worked with YouTube’s JS API, and we would be done here. But alas, that is not the case.
The YouTube JS API player is implemented in such a way that the video player itself (which is, the <video> tag itself) lives within an iframe. This is done for a variety of reasons that makes sense on YouTube’s part (mostly security reasons), but this also makes it impossible for us to do the WebAudio sound change above. Accessing a <video> DOM node inside of an iframe of another domain would be a cross-origin resource sharing (CORS), which isn’t allowed by YouTube’s server configuration (of course).
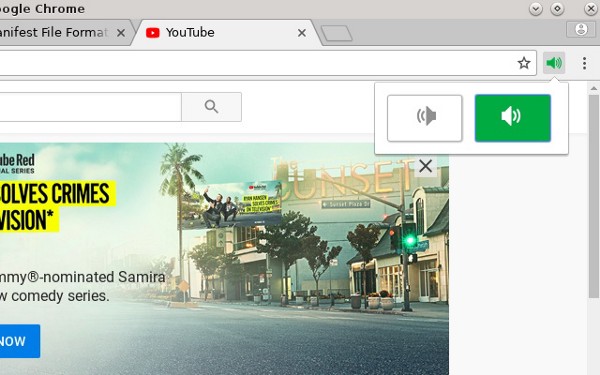
This leaves the only real way to do such a thing to be a Chrome extension. This is why I created the Left Right Sound Selection extension (source code/GitHub repo here), which basically contains the above code, but for all video or audio DOM nodes found on a page (as long as you have the extension enabled and you’re selecting the left or right channel from the extension popup like shown above).
The Chinese version of the app, SingK.net, prompts the user to install the extension if they wish to have the audio channel select functionality. Not ideal, but the best I could do, given the constraints. Fortunately, at least it isn’t common practice for English karaoke videos to have these split audio channels, so it wasn’t necessary to prompt this for Karaoke House.
Ultimately, this isn’t a project I had hoped to reach millions of users and grow to be a company; it’s a bit too niche of a use case and audience. Someone who loves karaoke enough to want to do that at home, and also have a media PC (with a reasonably good stereo system and mics!) set up in their living room. Nevertheless, it’s one of the more technically interesting side projects I’ve done, leading me to explore things like Flash Actionscript Sound Transform, WebSocket, QR Codes, Javascript WebAudio API, and even a Chrome extension. Hopefully, the learnings here will help somebody or even inspire somebody with a project!
Like singing? Give Karaoke House a try, if only to check out how it works!
Lead Engineer @knockdotcom. Previously, Principal Engineer @Massdrop, CTO @CoinTent, Architect @Zynga.